NEXT RACE INFORMATION

WHEN: Most Friday evenings. TIME:
...................................................................................

13 October 2008

Ecurie out and about with Newcastle slot car racer Tim Murch


Hobbyists often dabble in all forms of modeling. Three of us aero modellers stayed with hard core Newcastle slot car racer Tim Murch and his wife Ann this past weekend.
In addition to knife making, slot car racing and aero modelling, Tim has a yen for off road rc racing. So much so that he has built this stunning off road track in his back yard for his 1/16 & 1/18 electric off road race cars.

The serious esses remind one of the old Newscastle slot car track and Tim and his buddies have a ball on the tight and fun track with their Associated and Anderson off road racers.

We also from time to time lead Tim astray to some mountain top slope flying at Volksrust, a midway mecca for the Highveld, Free State and Kwazulu Natal RC slope fliers:

29 September 2008

slot cars of the sky....?


Is electric control line to model flying what slot cars are to model car racing.....?
For a change of pace, read the story here:

25 August 2008

Checking transistor controllers


After battling with Gordon's' economy transistor controller, I had to come to the conclusion that the transistor may be fritzed. Before getting round to testing the transistor, I spotted this simple way to test on a web site:
"With the meter set to measure ohms, clip one meter lead to the base connection of the transistor. Touch the other lead first onto the collector lead and then onto the emitter lead. The readings should both be the same, either both high resistance or both low resistance.
Now reverse the leads and repeat the procedure. The results should be the opposite of those obtained before. If they were both high before they should now be both low. If they were both low before they should now both be high.
Now measure the resistance between emitter and collector. It should read high resistance in both directions.
Note that for this to work the internal battery of the meter must supply a voltage high enough to overcome the forward resistances of the transistors. Many meters have a position marked with a diode symbol which must be selected when checking transistors or diodes."
(not sure where I lifted the reference pic but suspect in was from Chris Frost's excellent web site on transistor controllers).

18 August 2008

The Next Step in Scale Racing


The guys in Cape Town are taking Scale Racing to the next level. Al Paterson has produced the bodies shown in the picture above for and endurance race at the Cambridge track. They will be mounted on 1300U chassis and raced for 9-hours. The bodies and interiors are vac formed. For more information please go to http://www.slotcars.co.za/phpBB3/index.php and check out the EVENTS section.
These Group C cars will more than likely be what we will be racing in the 2009 Ecurie April Event for Open Class, although the bodies will be fibreglass laminated with Vacuum formed windows & headlights. The idea behind this being that the "kits" will be cheaper, stronger and easier to put together, resulting in less waste and quicker build times for entrants.

06 August 2008

Second show for the new Ecurie portable digital - pics and report from Phil Rix

A brief report on the Thomas More Fair.

At the outset, thanks to the team for giving up their day - Ashwin, Alwyn, Erlo, Mike, Costa and Phil. It made such a difference having a few more than we had at Bellair.

Our effort was a huge success. Despite a marginal location, There was hardly a break in the racing. Up to 6 drivers at a time, approximately 235 paying customers! Some commented on what good value it was. Marshaling was hectic, and without digital would have been almost impossible!

The layout had been further improved - see the red and white kerbs, the pit lane and the excellent and neat controller extension arrangement put together by Costa. Cars were well prepared by Costa which was a real plus. The idea for the barrier joiners came from Alwyn. Erlo made up a great banner which was prominently displayed. Thanks to Gordon for the vinyl numbers for the cars and controllers. Throughout the project, innovative ideas from all involved have contributed to the success of the concept. We learnt more and will keep improving.

The Fair was amazing. Massive, well organised and well attended. Club members missed a great event and the opportunity to see and experience digital racing. Erlo and Ashwin picked up some amazing bargains in 1/24 static kits. R30 per kit - an absolute give away!

Regards - Phil


25 July 2008

IMCA Worlds Feedback

Hi All

Well the 2008 Worlds has come and gone. Unfortunately we were not as successful as we would have liked. The guys here have a huge advantage, in that they run these cars on a regular basis with stiff competition, so they are leaps and bounds ahead of us in terms of developing these cars.

Alan Paterson managed a 3rd place in concourse, and I managed to grab 6th place. So we are at least not coming home empty handed. I will post a full report with pictures as soon as I get back to SA. There are results up on the IMCA website.

The beer here is excellent!! :-)

Regards,

Whizzkid (in Belgium)

07 July 2008

More on the economy transistor controller


Whilst cheap and cheerful is the name of the game for these economy transistor controllers, some concerns had been expressed regarding the long term wear associated with running the brass trigger tube on the sharp thread of a 2.5mm bolt. The test unit, packed with ceramic grease, seems fine so far but it was decided to also re look at the stock system of a 3/32 (2.4mm) tube inside the brass trigger tube. The biggest issue was to then source a 1/16 inch (1.5 or 1.6mm) bolt to support the 3/32 tube and uncle Lance of Durban Model Centre came to the rescue with the suggestion of cannibalising the "Radio Active horn" kits for the thin brass bolts and nuts. At R17 for a dual pack, yielding four bolts and eight nuts, there is little hardship in tossing out the plastic horn parts. The bolts fit perfectly in to the K&S 3/32 tubing and the vernier revealed these bolts at exactly 1.6mm diameter - perfect! This will be built in to the other Gordan unit to give a long term test comparison. The other upside is that one may be able to squeeze in the diminutive anti wobble nut without grinding a space on the bottom of the trigger.


Another issue was that it had originally been envisaged to retain the stock Parma three core cable but watching the 12 band diode unit built for Jacques/Daniel in action suggested that there may well be an element of full throttle power loss. An old article on the net on thin wire resistance had also supported this view and a visit was make to A1 radio to look for a much thicker although also cost effective alternative. There was a nice large core high strand but not uncomfortably thick clear shield dual speaker cable (part 140072) that fitted the bill at R14.95 per metre. This soft cable stripped apart beautifully, thus giving a twenty-two buck three core option. Soldered and braided lovely but obviously no where near silicon for heat resistance and life. Looks real larney, though!


All squeezed in!

Cheers


Dave

04 July 2008

Hobby Fair with new Ecurie portable digital track - Phil reports

The fair was a huge success. Pity more of the Club members didn't make it.

Thanks to Mike and Costa for a sterling effort. The whole concept proved successful. We proved that the track can be transported in one car, set up and manned by 3 people, though it would have been nice to have one or two extra to rotate the duties and to give others a break to look around and grab some refreshment. We had a never ending queue of kids. Costa did a particularly excellent job on race control and driver management. Mike and I marshaled, one at each end, took cash and issued tickets. We learnt a lot and will be even better prepared and organised next time.

The digital system worked flawlessly and is loaded with features. Great having the race time etc controlled automatically.

For much of the time we ran only 4 cars, but with better preparation we can comfortably run 5 or 6 cars and thereby increase the revenue. We did run 5 for some of the time. Had to shut down twice for about 15 minutes each time to grab a bite to eat. The Fair ran from 9am to 3pm with a bit of a slow start so all things considered, we did well.

Thanks to all who helped with the project. Next date is Saturday 2 August at Thomas More School in Kloof. Diarise now. Just to spare an hour or two of your time would make a huge difference.

Regards - Phil


Mike spreading the word and Costa sorting the drivers.


Neat Ninco layout with the framed Ecurie club track pictures in the foreground.


The Ecurie cars that have served the club so well....

Mike chatting to Dieter and Joseph Schauerte of Camperdown Model Car (RC) Club.

03 July 2008

Home brewed Porsche 917K


Dave prompted me to put these pics on the blog. The body and all other bits and and pieces like interior and engine detail are available from me to those interested.
At the last meeting I raced the red number 23 car and got down to 6.1 sec lap times.
The green Sandeman car I built for Mike.
The Decal sets for both cars and more are available from Craig Stydom.


11 June 2008

Economy board template scan


Defeated by the funnies of scanning, it steadfastly refuses scanning as a graphic (maybe the shine?). The scale is haywire but have something half workable after photostating. The print should measure 39mm mid point to mid point of the large 8mm holes.

The notes:

1.Masking tape the metal part of the PC board.
2.Plan your cut so the top right hand corner is used in each case. Minimises the number of cuts and is cost efficient as four boards come out one 150mm by 150mm board.
3.By all means add a bit more meat to the top but otherwise cut exactly on the line or even inside, it is such an exact fit in the case. The bottom left hand “tongue” can be lopped off if wanted, I left that there so the template outline can be used for other trigger combinations.
4.The original board locks in to the case, if there is wobble then one screw in the region of the brake stop (or the brake stop bolt itself) can fix the board to the left hand case – no others needed.
5.Eight mm for the main holes, 2.5mm for all the trigger related bolts and 2mm for the top two holes holding the wiper pad.
6.Use two RC servo mounting eyelets as the ideal spacer to bring the wiper pad up to the height of the wiper.
7.Score the two lines through the metal to break the contact surface in to brake (red) / throttle (black) / full (white).
8.Remove some of the board metal surface around the left hand wiper pad screw, under no circumstances should the “brake band” on the wiper pad be live, only the brake stop, as there is no dead band facility on the wiper pad.
9.A small part of the case top will have to been removed to all the resistors to peek out the top..

Assemble, fit pots to the case and connect up and ready to race.

Reference item 7. If one wanted to use a stock economy mechanism without stops, then the first band after brake is left dead and the brakes connected to the brake band. One then only has an 11 band controller for the throttle portion.


09 June 2008

Parma economy template for template ;-)


Costa was looking for an economy base template, along with Janet and John instructions, and myself keen to oblige whilst building Gordon’s controller, only to find I was out of fibreboard and had to resort to the reversed off-cut in the pictures, to form a “template for a template” when new board is obtained this week. It only needs 6 mm along the top edge for the final product, which has been trimmed to minimise cost and also revert back to mounting the two potentiometers in the case, a much prettier solution than the “all hang out” approach I took with Phil’s economy.

It also serves as a test for ultimate in simplicity, building the whole project with 2.5 mm nuts and bolts, a size at least easily available locally. The final product ended up such a perfect fit that it does not even need a bolt to hold it to the left hand case. The blow by blow, after the board is cut out with Dremel and drill:

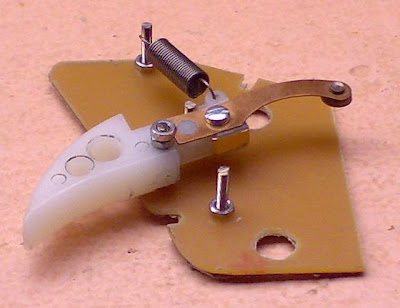
1. Leave the existing brass tube in the trigger and simply Dremel out a notch at the bottom, including the brass tube, to allow just enough room for the anti wobble nut, which locks the 2.5 mm trigger bearing bolt to the base board.
2. Take two flaps off old braid holders and super glue one each to the front and rear of the trigger, where the trigger will contact the stops. Dead easy although I went a bit further with some nice K&S thin shim sheet from Denkit – cuts with a pair of scissors.
3. Fit the trigger bolt and any wobble nut and slip the trigger on. The tube top normally just a teeny bit longer than the width of the trigger.
4. Very carefully wind on two 2.5 nuts to lock each other and allow the barest of slop up and down. I have used two nuts on my favourite controller for ages with no problems but by all means use a 2.5 mm Nylock nut instead if you wish.
5. The trick is that the trigger should only miss the base board by 0.5mm if you spin it, so careful with the notching in 1 and fine tune with thin washers if needed. Much more than a 0.8 mm gap and it will foul the case.
6. Bolt in the three 2.5 bolts for the stops and spring.
7. Now the part that requires some care – removing all the inside case pimples in the left case that would foul the board, along with opening both case sides in the trigger bolt area, so that the bolt and nuts just clear. I started with side cutters, followed by a Dremel with a 3mm drill bit for the trigger area and Dremel disk for completely cleaning off the pimple areas.

Erlo will quickly tell you that the 2.5mm bolt is a slop fit in the trigger tube but actually not much more than the standard economy frame and much less than the Ninco conversions from the old days. I would guess the spring pressure one way and the wiper pressure at 90 degrees actually keep things quite workable – time will tell.

The last step on the final template will be the two holes for mounting the wiper pad and obtaining the right size drill for the two large holes, my Dremel effort is ok but not that neat.

Lance also has some fancy Professor trigger bearing kits if one wanted to open the trigger hole and go for glory.

04 June 2008

Bridge Rectifier Controller circuit


The blog is the ideal place for storing useful technical info so I don't phone three people on a Saturday night for the diode polarity in a diode throttle and still assemble it backward (the silver band to the slow side, by the way ;-).

The circuit below is the popular Newcastle Full Throttle bridge rectifier version and, whilst simple, it is easily forgotten and a new project is shortly underway. In this case, it will feature six instead of five bridge rectifiers previously used for metal cars, with the two closest to full being switchable per the drawing, thus offering six sensitivity settings and usable from lead Scalex (6) right through to the hotter old fashioned specials (5).
A spare bridge rectifier was then used for the brake, similarly wired with the red brake cable going to switch "off" centre tap, neg (-) to the brake band plus one switch "on", and pos (+) to the other "on" switch position. Redundant by current use as way overkill and a better spread is obtained by potentiometer or rotary switch with 1amp diodes.

24 April 2008

An oldie but goodie

A reminder link off slotcarnews:

http://www.slotcarthrillart.com/slotcarart.htm

Takes one back to hot rod comic book days ;-)

28 March 2008

Complete "Open Class" Spec Car For Sale


Big Al is selling off one of his complete RTR Open Class spec chassis ,with one of the SA livery Nissan Skyline GTR bodies. This is a great buy for anyone interested in getting started in the True Scale Open Class category. Anyone interested can contact Al on alan@slotcars.co.za

10 March 2008

New Spec 1/24 Production Cars


Well Friday night was supposed to be the start of new spec 1/24 Production class. This however did not materialise due to the fact that only six people bothered to pitch up. Of those only two had completely built their cars ready to race, another was 90% complete and the others were, besides having new bodies, still old spec with 16D motors.


Anyway I used the opportunity to help complete some of those cars and did a conversion on Phil Rix's car from scratch in 15mins flat and helped Costa complete his Porsche body. We finally managed to get some running in a little later in the evening with four new spec cars and one old spec car driven by Ashwin. Not surprisingly, all the cars were pretty evenly matched with Costa, Mike and Phil all posting times in the 5,1-5,2s range, on a track that was severely lacking in rubber. My car was slightly quicker at about 4,8s, but I had the added advantage of running slightly stickier rubber. Having said that though there was no noticeable difference in straight line speed between the cars, which was pretty much the whole idea behind the class. I am looking forward to next months event, where perhaps we will actually be able to get some racing in!

29 February 2008

DVR GT12 CHASSIS NOW AVAILABLE


Dawie Van Rooyen has produced a rather nice looking GT12 chassis for anyone who is interested. According to him it handles excellently, and if his previous specials chassis are anything to go by, these chassis should be at the top of the pile come the end of this years SAMCA calendar.

28 February 2008

Part 2a - Erlo's Useful Economy trigger bearing mod

Here is something to do with those old Slot It crown gears.

I cut off the piece of the brass end piece with the grub screw from the spur gear and used three of them to mount the trigger for the controller as Dave described using PCB.

The brass (brass is important for soldering) crown gear under the trigger is soldered to the PCB and once the top and bottom crown gears are tightened the trigger is rock solid with no wobble. The spur gear under the trigger is not fitted with the grub screw.
Regards
Erlo


11 February 2008

Parma Economy transistor part 2 - modding the nylon trigger

The Parma nylon trigger is shown from the rear side and the blue area removed with a dremel, which leaves useful space for a couple of washers and antiwobble nut. I use one of the case bolts, bolted through the pc board and trimmed afterwards (not with the nyloc on cause it melts the plastic, as I found – use another normal slave nut when cutting ;-). I ferreted around until I found some scrap thick walled tube and cut it just a shade longer than the thickness of the narrowed down plastic trigger at that point. I measured the OD of the tube and drilled the hole 0.5mm smaller than the tube OD in the existing trigger hole and the tube is then a neat fit, sticking out a tiny bit top and bottom. The nyloc only winds down far enough to just stop the trigger floating up and down and does not bind it from turning – there is a sweet spot.

The nyloc idea from Professor/Slotworks trigger set up and one could use their upgraded tube kit (their stock tube is the ideal length by the way) and put in a longer bolt with anti wobble nut, if the home brew tube part is tedious:
http://www.professormotor.com/images/pmtr2031.jpg

This is why I am excited about getting imperial stuff from Pinetown nut and bolt, metric does not work too well with K&S imperial tubing. ;-)

The trigger must only just clear the PC board or the whole caboodle will battle to fit in the case. This took longer to type out than do!
NB - If working ahead and creating you own cradle board from other similar boards, please note that the Parma Economy trigger is more rear set than other triggers like the turbo (about 2.5mm) so jig the set up for the trigger's own unique spot or the front of the trigger will bind on the case.

28 January 2008

Transistor conversion of Economy controller - part 1


Inspired by Erlo (along with disappointed enquires from Jacques and Gordon ;-) and the success both Erlo and I have had with the inexpensive Euro True Scale controller circuit last year, I revisited the previously unsuccessful Parma economy controller conversion for Phil, on Saturday afternoon, with the emphasis on quick build. The offending metal frame was thrown out, the trigger opened up slightly to fit a bigger tube (was even quicker to do than explain ;-) and the result bolted to a single PC board (any thin board would do, with an after-market wiper board added) with the significant advantage of an intermediate anti wobble nut clasping the board solid, which extending the useful bottom cut out in the Parma economy Nylon trigger easily facilitates.

The result was the same knife through melted butter feel I enjoyed on mine with the brush wiper last year and a layout that has little or no chopping up of the controller case (something I hate), with the spring post, brake stop and full throttle stop 3 bolts simply bolting right through the case to hold the board in rock solid. Version two will have the 12 band board mated to it for a total in the case wiper board fit and then to try charm uncle Craig to knock me off some new spec 12 band boards or maybe even one single all encompassing board. This could then mean one could offer a really simple and compact (even if not very pretty) self build option for all those folk who wave Parma economy controllers at us, hoping for a miracle. The transistor R35, brake pot R26, and sensitivity pot R15 make for a simple single board conversion that club members could do for themselves on existing units with a nylon trigger upgrade, or for all up cost under R500 including a new Parma nylon trigger economy controller........

There will also be old defunct 16D motor brush box units lying around with us changing to Falcons, so one can easily switch from normal wiper button to magic wiper brush ;-)

Ideal for all the classes we now will run at Ecurie although fine with 16D as well. Sceptics should note mine with the same less heatsinked transistor located in the handle coped fine with my whole team of newbies for the whole of the 1.5 hour social enduro.

Once the electrics are in and things sorted, I will load on the blog a version 2 board scan for tracing and local SA component links for easy reference, including the Hella (from Akals) R30 relay option I have enjoyed with 100% reliability for a year. The only extra tools I needed were a Dremel and electric screw driver for careful drilling, along with a Saturday afternoon.

Yup, a Turbo, Slotwiz or Slotworks it is not, but just as competitive for club racing. Part 2 will have the component sources plus base board outline.

The circuit used is from these interesting sites, which are well worth a surf and the drawing is tweaked appreciatively from the first site, which features the popular German circuit:


21 January 2008

Phil's pics from the social 1.5 hour Enduro


Nice view of race track action. If one looks carefully at the red blur at the donut on the full size pic, it is none other than flashman marshaller Pete Camp of ex Raceworld who kindly donated all the HRS cars and a host of equipment to Ecurie on closing up Raceworld.
Some of the visiting folk - Kerry from winning team on right.


The lane colour co-ordinated HRS chassised cars were bullet proof.


Banter tween Craig the marshall and Annetjie on Blue lane.

Costa junior ponders all the tall opposition....


Dave dazzled by Phil's flash and an indifferent black car being passed by Costa on green, with regular monotony.


These youngers were earnest in their marshalling - the lad on the right missed the start but marshalled all night - at the tender age of 4.75.


Gordon charming the lasses.


Erlo and Craig on race control and paling at the progress of the advancing team Dave ;-)


Chairman Mike Wilkie with Ashwin on race control - Ashwin predicting the race outcome very early.


What an awesome event! Thanks to everyone who gave up time and put in effort to get the show on the road. The 15 minutes per lane with 5 minute driving slots worked well. Drivers rotated quickly and all got a decent number of turns throughout the evening. Thanks to Erlo for sorting out the cars which performed well - Costa for controlling the event - Alwyn, Jeanette and family in the canteen and all the other members who contributed in some way or another.

The Fox